In this blog, we will discover how to import BigPond to IMAP accounts. We are getting some queries on the BigPond to IMAP migration process, so we decided to address this issue. If you are also looking for the same then this blog is for you. It includes complete step-by-step tutorial to transfer emails from BigPond to IMAP server with attachments. Let’s get started with the process.
Migrating email from BigPond to IMAP can be very easy if taken in an appropriate way. Different users have different reasons to migrate from BigPond to IMAP supported email clients. IMAP provides far better synchronization, remote accessibility, and other effective email management features. Hence, users are looking for an easy technique to import BigPond to IMAP in a hassle-free way.
Why Migrate Emails from BigPond to IMAP
- IMAP allows users to access emails from various devices without limitation.
- If you make some changes on one device, it will be updated on all other devices.
- Emails remain in the server, thus you have a lots of space on local storage.
- IMAP offers email migration between different email clients in an easier way.
The Best Approach to Import BigPond to IMAP Server
One of the proven methods to transfer emails from BigPond to IMAP server is Yota IMAP Migration Tool. this tried and tested tool allows you to migrate multiple emails from BigPond to IMAP in a single process only. It provides a direct option to export selective emails also. It also preserves the folder structure, and helps you to keep emails in an organized manner.
If you want to evaluate the tool, then download the free DEMO of the tool. It will let you convert 10 emails per folder. After that, you can go for the upgraded version of the tool for unlimited migrations.
Steps to Import BigPond Emails to IMAP Server are as follows:
- Download and install Yota IMAP Migration Tool on your computer.
- Click on Open>> Email Accounts>> Add Accounts.

- Provide login details of BigPond account and select the required emails to convert.

- Next, go to Export and select IMAP as the saving option.
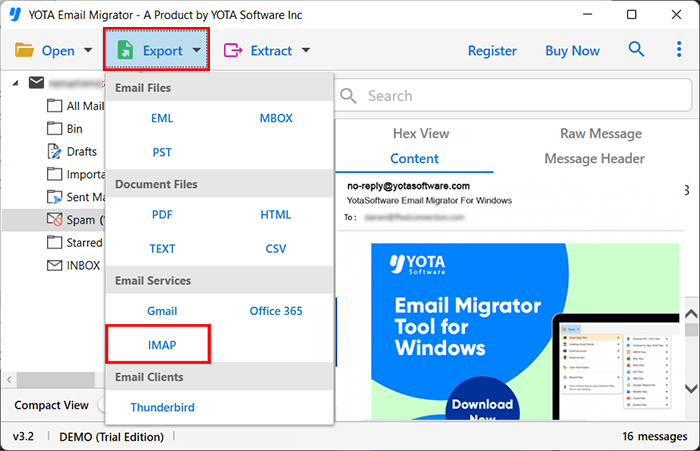
- Enter the credentials of the IMAP email account and hit the Save button.

That’s it! You can easily import BigPond to IMAP server using the above few steps.
Benefits of Using Yota BigPond to IMAP Migration tool
Users can easily export complete mailbox items from BigPond to IMAP server using this software. It also allows you to transfer all folders to the destination IMAP account without any hassles.
With this tool, you can migrate specific emails based on multiple filters like to, cc, bcc, with a specific subject, or even date range, ensuring that only the necessary emails are transferred instead of complete mailbox.
The utility ensures the retention of the original folder hierarchy from the account, making sure that all emails would remain intact within folders and subfolders after the migration process completed.
There is no requirement of any third-party application to import BigPond to IMAP server as you just have to provide the login credentials for both the accounts. Thus, a direct migration can be performed using this software.
Conclusion
At last, we just want to tell you that, if you don’t want to lose your data in BigPond to IMAP migration process, then you should go for the automated tool, i.e. Yota Email Migrator. It is designed with high proficiency and advanced algorithm that can keep your data 100% safe and secure. In the above blog, we have given the complete steps to import BigPond to IMAP server so that you don’t have to take stress.
Frequently Asked Questions
Can I migrate only the selected emails from BigPond to IMAP account?
Yes, utilizing this software, you can easily migrate specific emails from BigPond account with smart filters.
Can I install this BigPond to IMAP Transfer Tool on Windows Server 2022?
Yes, definitely! You can easily install this tool on all Windows OS and Windows Server including 2022 also.


