Looking for a solution to import PST to Office 365 without any complications? Many Outlook users find it challenging to find a reliable technique to migrate PST file to Office 365. With the assistance of the right solution, users can easily upload PST to Office 365. In this article, we’ll provide the three tested and verified solutions to make the PST to Office 365 migration process error-free and smooth.
Now, let’s discuss all the methods one by one.
How to Import PST to Office 365 Using Outlook?
Follow the steps below for migrating PST files to Office 365 using the Microsoft Outlook application:
- Open Outlook and click “File,” then select “Add Account.”
- Enter your Office 365 webmail account email ID and click “Connect.”
- Then enter your account password and click “Sign In.”
- Follow the instructions to set up your account and click “OK.”
- Reopen Outlook on your computer and go to the “File” tab.
- Click “Open/Export” and “Import/Export” option.
- Select “Import from another program or file” and click “Next.”
- After that, select “Outlook Data File” and click “Next.”
- Click “Browse” to locate your PST file and click “Open.”
- Select a folder for your PST file and click “Finish.”
All done!
Limitations: MS Outlook is a paid email client that requires a subscription fee. You also need to have technical expertise to complete the configuration task.
How to Upload PST File to Office 365 via AzCopy Tool?
This method consists of four different steps to import PST to Office 365 webmail. Follow the listed instructions to achieve this:
Phase 1: Create a SAS URL
- First, sign in to your Office 365 account and open the Compliance Center.
- In Microsoft Perview, click on “Data Lifecycle Management”.
- In the “Overview” section, select the “Import” option.
- Click “+ New Import Job” and enter a name for the job.
- Select the “Upload Data” option and click “Next.”
- Select “Show network upload SAS URL” to generate a SAS URL.
Now, you can copy the SAS URL for the next stage.
Phase 2: Download and use Azure AzCopy
- Visit the official Microsoft website and download AzCopy according to your system requirements.
- Unzip the downloaded ZIP file and extract the file.
- Open a command prompt and navigate to the location of the AzCopy executable using the cd command: cd <path to AzCopy>
- Upload your PST files to Azure Blob Storage using the following command: azcopy.exe copy “<PST file path>” “<SAS URL>” –recursive=true
- Replace <Local-PST-File-Path> with the location of your PST file and <SAS URL> with the SAS URL that was generated.
- Once the upload is complete, return to the Compliance Center and select “Upload Complete” to continue.
Phase 3: Create and Upload a Mapping File
- First, download the PST import mapping file template from the official Microsoft link.
- Open the template in Microsoft Excel.
- Enter the following information:
Workload: Use “Exchange.”
FilePath: The path to the PST file in Azure Blob Storage.
Mailbox: The email address of the target mailbox in Office 365.
IsArchive: TRUE for archive mailboxes, FALSE for primary mailboxes. - Click File > Save As and select “CSV UTF-8 (Comma Delimited)” as the format.
- Return to the Office 365 Compliance Center.
- In the “Data Import” section, select “Upload File” to upload your CSV file.
- Click “Validate” to validate your mapping file.
- After successful validation, click “Next.”
Phase 4: Filter and Submit your Import Job
- In the Import Data window, select the PST file you uploaded.
- Choose whether to import only filtered data or all data.
- Click “Submit” to start the import process.
- A message will appear indicating the size of the PST file to be imported.
- Please wait until the PST analysis is complete. Depending on the file size, this may take several hours.
That’s it! These are the manual steps you need to import PST to Outlook 365 webmail.
- Each step requires technical knowledge.
- Network upload is a difficult and time-consuming process involving multiple steps.
- There is a 20 GB limit to move PST to Office 365.
- Importing PST files using PowerShell can be complex and may result in data corruption.
What can you do now? Don’t worry! There’s an alternative method to transfer to Office 365 account, which is explained in the following section.
How to Migrate PST to Office365 Directly?
Yota PST File Converter is an automated software that can be used to import PST to Office 365 account directly. It is equipped with many advanced features, and users can easily perform PST file migration to Office 365 in a few minutes. It can upload multiple PST files in a single attempt. The tool preserves all email attributes and folder structure while importing.
The software has a simple yet advanced panel to enhance the user experience. Download the free demo of the tool now. It works with all versions of Microsoft Windows, such as Win 11, 10, etc.
Steps to Transfer PST to Office 365 Account
- Download and run the software on your PC and click Open.
- Click on Email Data Files and select Outlook PST Files.

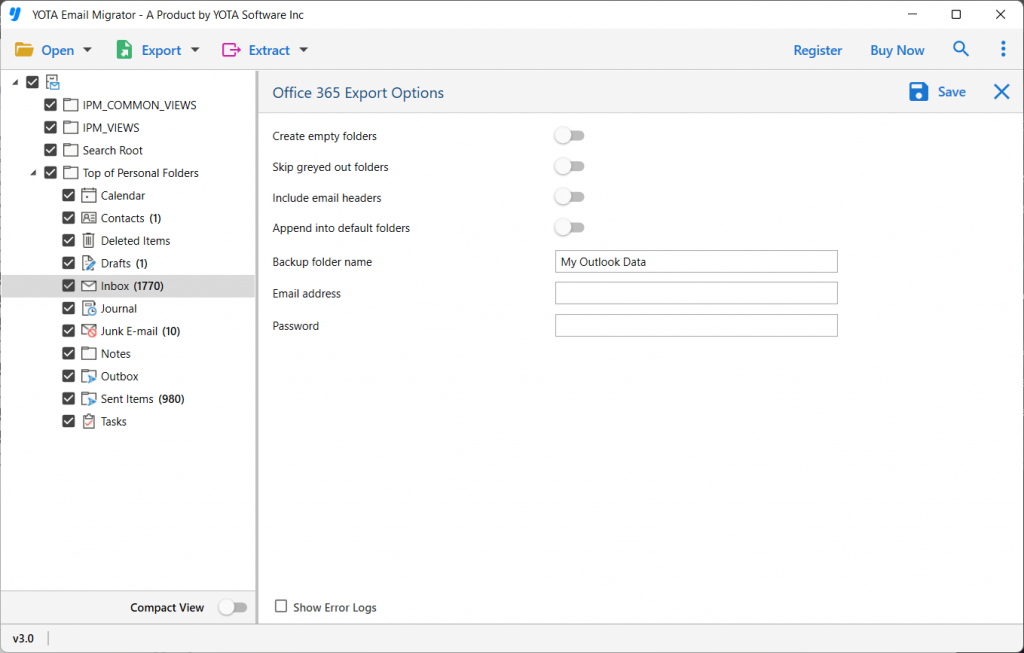
- Click on the Export tab and select Office 365 as a saving option.
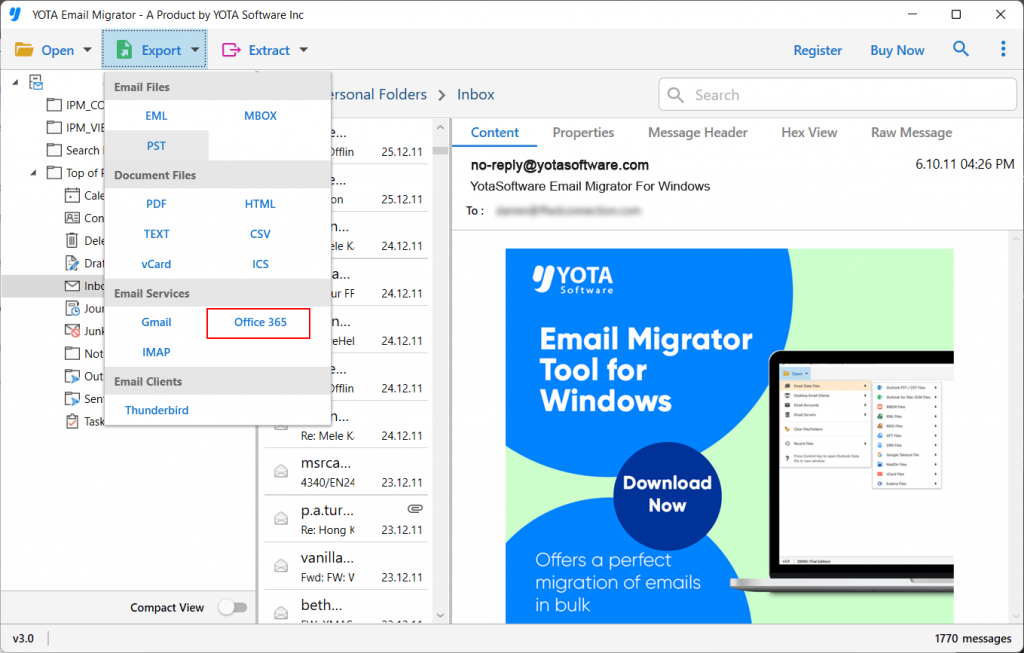
- Now, enter Office 365 login details and hit the Save button to begin the import process.
That’s it. This is how you can migrate file to Office 365 account in a direct manner.
Watch: How to Import PST to Office 365 With Attachments
<Remarkable Features of PST to Office 365 Migration Tool
- The software makes it easy for you to import PST file to Office 365 with your attachments.
- The original format of files will remain the same throughout the migration process.
- You can migrate thousands of PST files to Microsoft 365 in the exact form, as no file size limit is available during the migration.
- The PST to Office 365 Converter maintains the structure and formatting of your data while importing.
- You do not need to install any other software on the computer to complete the migration process.
- It also lets you extract phone numbers from PST file with no loss.
Conclusion
In the above write-up, we have briefly described the possible methods to import PST to Office 365 account. Now, you can choose any of the methods that suits you best. However, if you want to upload PST file to Office 365 webmail directly, then the recommended migration tool is the best choice.
Frequently Asked Questions
Q1. Does O365 import PST files directly?
Ans. No, Office 365 does not import PST files directly. However, you can migrate PST files into Microsoft 365 using Outlook, Network Upload and tools like Advik PST to Office 365 migration.
Q2. How do I import a PST file into Office 365 with attachments?
Ans. The software holds all data of PST file including attachments while importing.
Q3. Does your siftware preserves folder hierarchy while importing?
Ans. Yes, the software keeps the original structure of mailbox folders even after the process.