Looking for the easy solution to move PST files to Webmail account? If yes, then read this blog. Many users want to import PST to Webmail services. Here, you will find the two different ways to open PST file in Webmail account.
Method 1. Manual setup using IMAP (free manual way)
Method 2. Automated tool (for faster and bulk import)
So, read this blog till the end and get the best method for migrating your Outlook data file without any trouble.
Why Import PST to Webmail?
Here are some reasons for transferring PST files to Webmail:
- Access PST data from anywhere via browser.
- Switch from desktop Outlook to a cloud-based email platform.
- Keep all your data in one place for easy access and management.
- Benefit from Webmail’s built-in security features to keep data safe.
Let’s start the manual process first.
How to Open PST File in Webmail Account Manually?
Follow the given steps to import PST to Webmail via the Outlook email client.
- Launch the Outlook application on your system.
- Click on the File tab and select Add Account.
- Add your Webmail account to Outlook.
- After configuration, go to File >> Open & Export >> Import/Export.

- In the Import/Export Wizard, choose Import from another program or file.
- Select Outlook Data File (.pst) and hit Next.

- Browse and choose your PST file to import.
- Select the recently added Webmail mailbox folder and click Finish.
The importing process is complete!
How to Transfer PST File to Webmail Professionally?
Check the Yota PST Converter tool to directly import PST to Webmail account. The software can directly migrate PST file without any external application. It can upload multiple PST files in one go. This software not only transfers your data files but also keeps the folder structure the same as the original. The advanced search feature is given so that the user can find the required files from the entire mailbox.
It is designed to be easy to use, with a preview of all PST files before importing. A demo version of the email migration tool can also be downloaded to check its efficiency.
Steps to Import PST to Webmail are:
- Download and Install the tool on your PC.
- Click on Open>> Email Data Files and select PST File.

- Next, click on the Export tab and select the IMAP option.
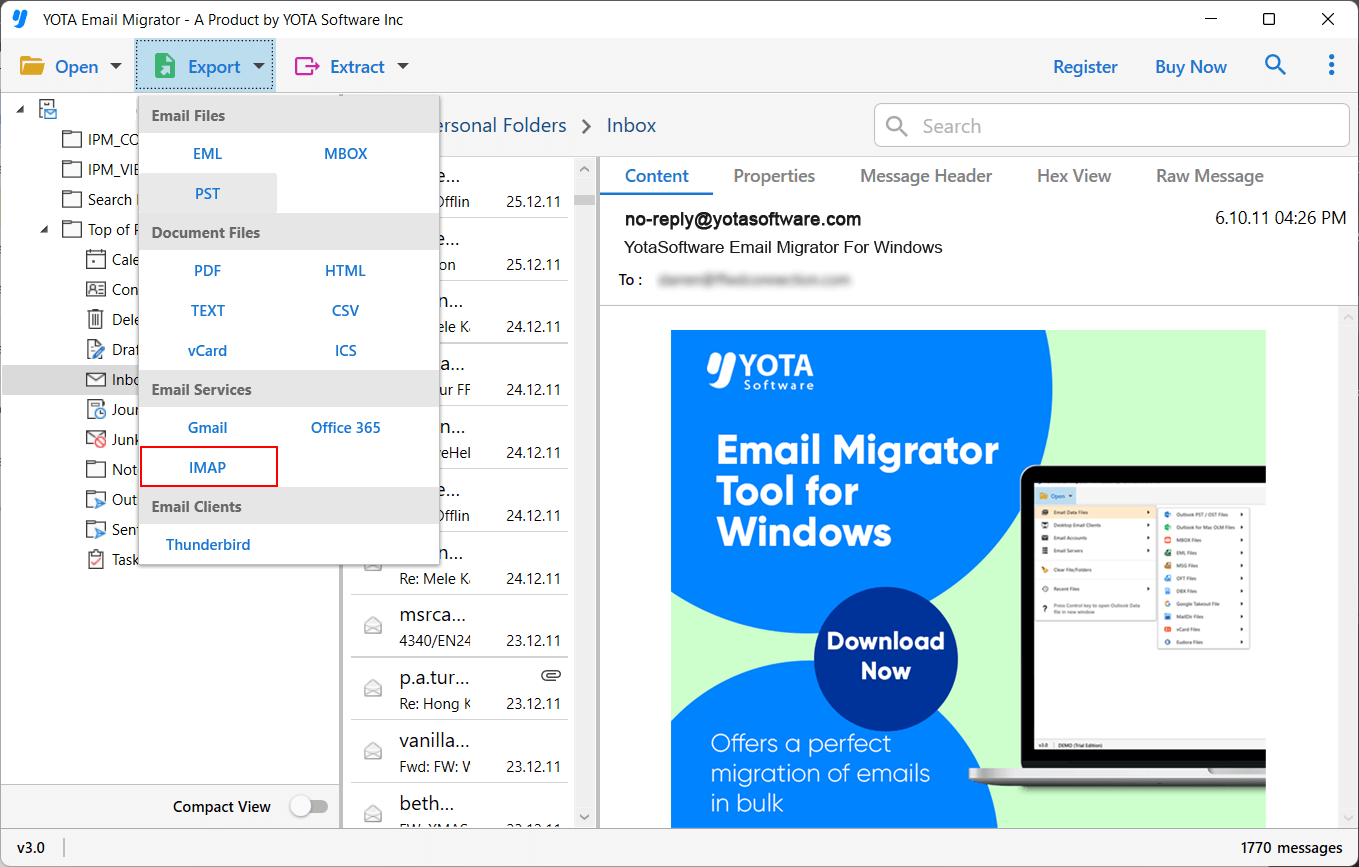
- Enter your webmail account credentials and hit the Save button.

Finished!
Watch: How to Import PST to Webmail With Attachments
Benefits of Using a Professional Tool
- Directly import PST file to Webmail without any configuration.
- Dual option for migrating PST file in bulk.
- Preserves all email attributes while importing.
- Maintains the original structure of mailbox folders even after the process.
- Multiple saving options to convert PST to MBOX, PDF, EML, etc.
- Also import PST to IMAP Server, such as Gmail, Yahoo, Zoho, and many more.
- Allows you to choose specific folders for importing.
- Supports PST files exported from all Outlook versions.
- Simplified user graphical interface for all types of users.
- Widely compatible with all versions of Windows OS.
- A free demo version to check the working procedure.
Conclusion
In this post, we have discussed how to import PST to Webmail manually and automatically. You can open PST file in Webmail using Outlook, but it takes a lot of time to complete the process. For a quicker and safer solution, try the above-suggested tool.
Frequently Asked Questions
Q 1. How to Open PST file in Webmail?
Ans. In the above post, we have shared 2 effective ways to import PST file to Webmail account. You can check and choose any that suits your needs.
Q 2. Can I import PST to Webmail without Outlook?
Ans. Yes, the Yota PST file converter tool allows you to open and transfer PST file to a web account without the Outlook application.
Q 3. Does this tool allow me to migrate only specific emails from PST file to Webmail?
Ans. Yes, it gives you the freedom to apply filters and migrate selective emails from the Outlook PST file to your webmail account.